Turn any USB drive into a permanent multiboot drive with Ventoy
Ventoy is an open source utility that turns a flash drive into a permanent multi-boot device: you only need to install the software once and, from then on, copy ISO, WIM, IMG, VHD(x) or EFI files as if they were ordinary documents so they can be booted from a single menu, without formatting the disk again.
Since its first version, released in April 2020, the tool has racked up more than 78,000 stars on GitHub and has become the de facto standard for technicians, system administrators and enthusiasts who need to carry dozens of operating systems on a single device.
Ventoy, much more than a simple USB boot
To understand what makes Ventoy special, it helps to remember how the traditional method works. Tools such as Rufus or balenaEtcher write an ISO image directly onto the device and format the drive in the process. The result is a flash drive that can only boot a single operating system: if you want to install Windows 11 one day and Ubuntu the next, you have to run the tool again, format the drive and lose everything that was on it.
Ventoy breaks with that logic. The project, developed by Chinese engineer Hailong Sun, known in the community as longpanda, uses a radically different approach: instead of writing the ISO to the disk, it mounts it virtually as if it were a block device. The technical key is that the flash drive is split into two partitions. The first, formatted in exFAT by default, is the data partition where you copy your image files. The second, a small FAT partition of about 32 MB that Ventoy calls VTOYEFI, hosts the bootloader, built on a modified version of GRUB 2.04 and an EDK2-based UEFI application.
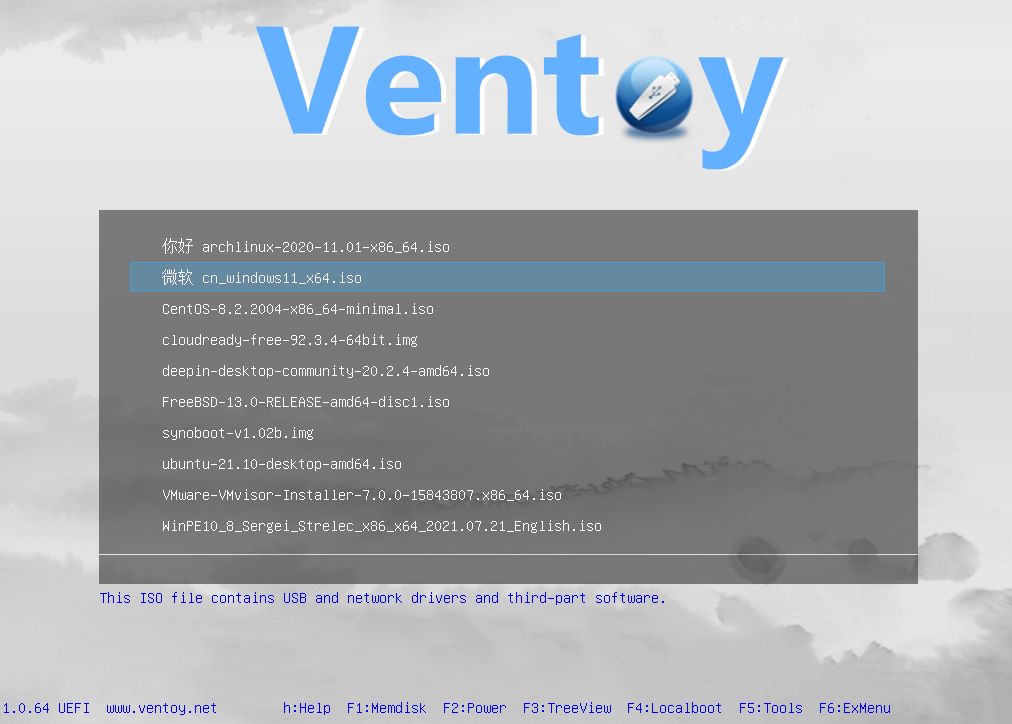
When the computer boots from the flash drive, the Ventoy bootloader recursively scans all the folders on the data partition, detects the image files and generates a boot menu. When you select an image, Ventoy interpolates its contents as if it were a CD-ROM or a physical disk in the eyes of the target operating system, without needing to extract the file. That virtualization mechanism, based on sector mapping tables, is what allows a single device to boot Windows, dozens of Linux distributions, recovery tools and diagnostic utilities without touching the flash drive again.
Ventoy listing several systems for USB boot
Broad, proven compatibility
Ventoy's main strength is its compatibility. According to the official documentation, the project has tested more than 1,300 image files and supports more than 90% of the distributions listed on DistroWatch. The list includes all versions of Windows from Windows 7 to Windows Server 2025, hundreds of Linux distributions (Ubuntu, Fedora, Debian, Arch, Kali, Tails, Linux Mint, MX Linux, among many others), as well as utilities such as SystemRescueCD, MemTest86, GParted, Clonezilla or rescue antivirus tools.
This versatility rests on support for multiple architectures and boot modes: x86 Legacy BIOS, IA32 UEFI, x86_64 UEFI, ARM64 UEFI and MIPS64EL UEFI. Ventoy supports both MBR and GPT partition schemes and can be installed on USB flash drives, SD cards, local disks, SSDs and even NVMe drives. In addition, using exFAT as the default file system makes it possible to handle image files larger than 4 GB, the classic FAT32 limit, which is essential with modern Windows installers, which comfortably exceed that size.
Ventoy is not limited to basic booting. It has supported Secure Boot in UEFI since version 1.0.07 and ships with it enabled by default since 1.0.76, which avoids having to disable this protection on many machines. Since version 1.1.14, released in 2025, the project renewed its secure boot certification authority (CA) in response to the 2023 UEFI CA problem, so on the first boot with these versions you need to enroll the new key, a process that usually only has to be done once per machine.
Other notable capabilities include persistence for Linux live systems (since 1.0.11), which lets you save files and settings between sessions; automated installation of Windows and Linux through answer scripts with variable expansion (since 1.0.09); booting of VHD/VHDX virtual disks and WIM images; GRUB2 mode to solve compatibility problems with certain Linux images; and a system of plugins, themes and passwords to protect the boot menu. Ventoy can also browse and boot images stored on the local disk, not just on the flash drive.
How to install Ventoy on Windows
Installing Ventoy on Windows is a straightforward process that does not require advanced knowledge. First, download the ventoy-x.x.xx-windows.zip package from the official page at ventoy.net. Unzip the file and run Ventoy2Disk.exe as administrator (right-click and "Run as administrator").
In the window that opens, select the USB device where you want to install Ventoy from the drop-down menu. It is essential to verify that you have chosen the right disk by checking the drive letter and capacity, because the installation will format the drive and erase all its data. Then click the Install button and confirm the two warning messages that appear. The process takes between one and three minutes. When it finishes, the flash drive will be ready for use.
From that moment on, the drive appears in the file explorer as a disk labeled "Ventoy". To use it, simply copy the ISO files (or WIM, IMG, VHD, VHDX) onto the disk, either in the root or in folders to keep them organized. Ventoy automatically detects all image files in all folders and subfolders and lists them in its boot menu. To add more images, copy more files; to remove them, delete them. There is no need to reformat or reinstall anything.
On Linux, Ventoy offers several installation paths: a native graphical interface (GTK/Qt), a web interface and command-line mode. The most common method is the terminal one. Download the ventoy-x.x.xx-linux.tar.gz file from the downloads page (Ventoy recommends verifying the SHA-256 hash before using it), unzip it and, first of all, correctly identify the USB device with a command such as lsblk to confirm its path, for example /dev/sdb.
The standard installation is done with the following command as root:
sudo sh Ventoy2Disk.sh -i /dev/sdb
The command accepts several options: -i installs Ventoy and fails if the disk already has it installed; -I forces the installation; -u updates an existing installation while keeping the files; -s enables Secure Boot support; -g uses the GPT partition scheme instead of the default MBR; and -L lets you label the main partition. For those who prefer the graphical environment, simply run ./VentoyGUI.x86_64 inside the unzipped directory and follow the same flow of selecting the device and clicking Install.
After installation, copy the images to the data partition, for example with:
cp ~/Downloads/ubuntu.iso /media/$USER/Ventoy/
It is important to remember that the initial Ventoy installation erases all the contents of the device, so it is advisable to back up any important data before starting.
To boot from the Ventoy flash drive, connect it to the computer, restart and access the boot menu (usually by pressing F12 on many Dell, Lenovo or HP laptops, F9 on some HP desktop machines, or Esc on other systems). Select the USB device and the computer will boot into the Ventoy menu, which lists all available images. Use the arrow keys to choose the desired image and press Enter to boot it.
One of the most useful features for getting the most out of Ventoy is TreeView mode. If you press F3 inside the boot menu, you switch from the alphabetical list view to the tree view, which mirrors the actual folder structure of the disk and makes organization easier when you accumulate many images. It is also worth knowing about GRUB2 mode, accessed by pressing r or Ctrl+R, which helps boot certain Linux images that fail with the default CD-ROM emulation method.
To take advantage of the advanced features, Ventoy includes an ecosystem of plugins configured through the ventoy/ventoy.json file on the data partition. The VentoyPlugson graphical tool, accessible through the VentoyPlugson.sh script and a web interface on port 24681, lets you configure these plugins without editing files by hand: menu themes and customization, persistence for Linux live systems (for example, creating persistent images with the CreatePersistentImg.shscript), automated installation scripts and protection passwords.
Why is Ventoy still relevant in 2026?
Six years after its launch, Ventoy has established itself as a fundamental part of the toolkit of anyone who works with operating systems. Its approach has not needed to reinvent itself because it tackles a real and constant problem: the cost of preparing and maintaining boot media. Compared with the alternative of creating a separate flash drive for each ISO, Ventoy offers a single reusable drive, compatible with practically every system on the market, that can also still be used as normal storage when it is not being used to boot.
For system administrators deploying machines over the network, support technicians who need to carry an arsenal of rescue tools, or enthusiasts who try out distributions frequently, the time savings are immediate and cumulative. The addition of Secure Boot, persistence, automated installation and its plugin ecosystem has turned what began as a simple utility into a complete boot platform, backed by a community that keeps testing and expanding the list of compatible images. In a landscape where free software keeps gaining ground on the desktop and in professional workflows, Ventoy is an example of how a well-designed tool can solve a problem elegantly and become de facto infrastructure.